In our virtual, yet isolated, current environment, it is important to continue maintaining healthy relationships with students. “When kids spend their daytime hours in safe, supportive schools where adults work every day to build strong relationships with every student, they are simply better, more engaged learners” (source). Yet, how do educators continue to build strong relationships when students are on the other side of a screen? The suggestions below offer strategies to maintain strong relationships with students despite the virtual connection (source).
Communicate frequently – it is important that students see and hear you frequently. This action can be done through video chats or by posting videos on your LMS (learning management system – Schoology, Canvas, Google Classroom, etc). Students need to know you are thinking of them often.
Create a routine – In person classroom routines are important, thus, virtual learning routines are important. The routine can be accomplished through morning meetings, responding to daily prompts, daily announcements, read-alouds, etc. Any type of activity that can be completed daily in order to create an environment that is safe will help students know you are there and available.
Virtual check-ins – there are numerous students that benefit from daily check-ins with teachers in the school setting. This same type of check-in can be completed online. Whether they give a visual thumbs or down or they complete a Google Form like this one, students need to be able to share how they are feeling with the teacher and you as the teacher can pinpoint who is doing well and who is not.
The focus of education has shifted dramatically in the last few months due to the closure of face to face instruction. This unprecedented time has been deemed trauma-informed teaching. In order to prevail through the situation, many educators have turned to virtual education and video chats. The issue with video chatting is that there are limited ways to engage students through a screen. Below are several recommendations for amping up video chats in order to help educators finish the school year strong (source).
Invite a guest speaker – think book authors or experts in your field. You never know if someone will say yes until you ask.
Take your class on a virtual field trip – there are numerous options for virtual field trips right now so utilize your host screen and take your students on a journey. Click here to view a list of current virtual tours.
Connect your students to another class – create an environment of global curiosity and connect your class with another class in another state or country. Students in both classes can work on projects together while both teachers co-teach. Twitter is a great place to find educators with similar passions to yours.
Create a design thinking project that engages students both on screen and off screen. Future Design School created a Facebook group that includes at home design thinking resources.
This week we’re investigating maker education, tinkering, and coding in our educational technology courses. Translating all the hands-on experiences from our face-to-face class meetings into the online learning environment has been a fun challenge. Thankfully, we actually began preparing this module for the online environment in Summer 2019, so it has been a work in progress. A special thanks to colleague and EdTech Team member, Melissa Marshall, for helping develop the module.
I thought I’d share some of the resources that I put together. Perhaps these will give families ideas to spice up their days of quarantine. Please share your ideas and recommended resources in the comments, so that our preservice and in-service teachers can learn from you, too.
Slideshow of Examples
Browse through this slideshow to view examples that might spark inspiration for your next maker or tinkering project.
Possible Materials
Feel free to bookmark, save, or print the following document.
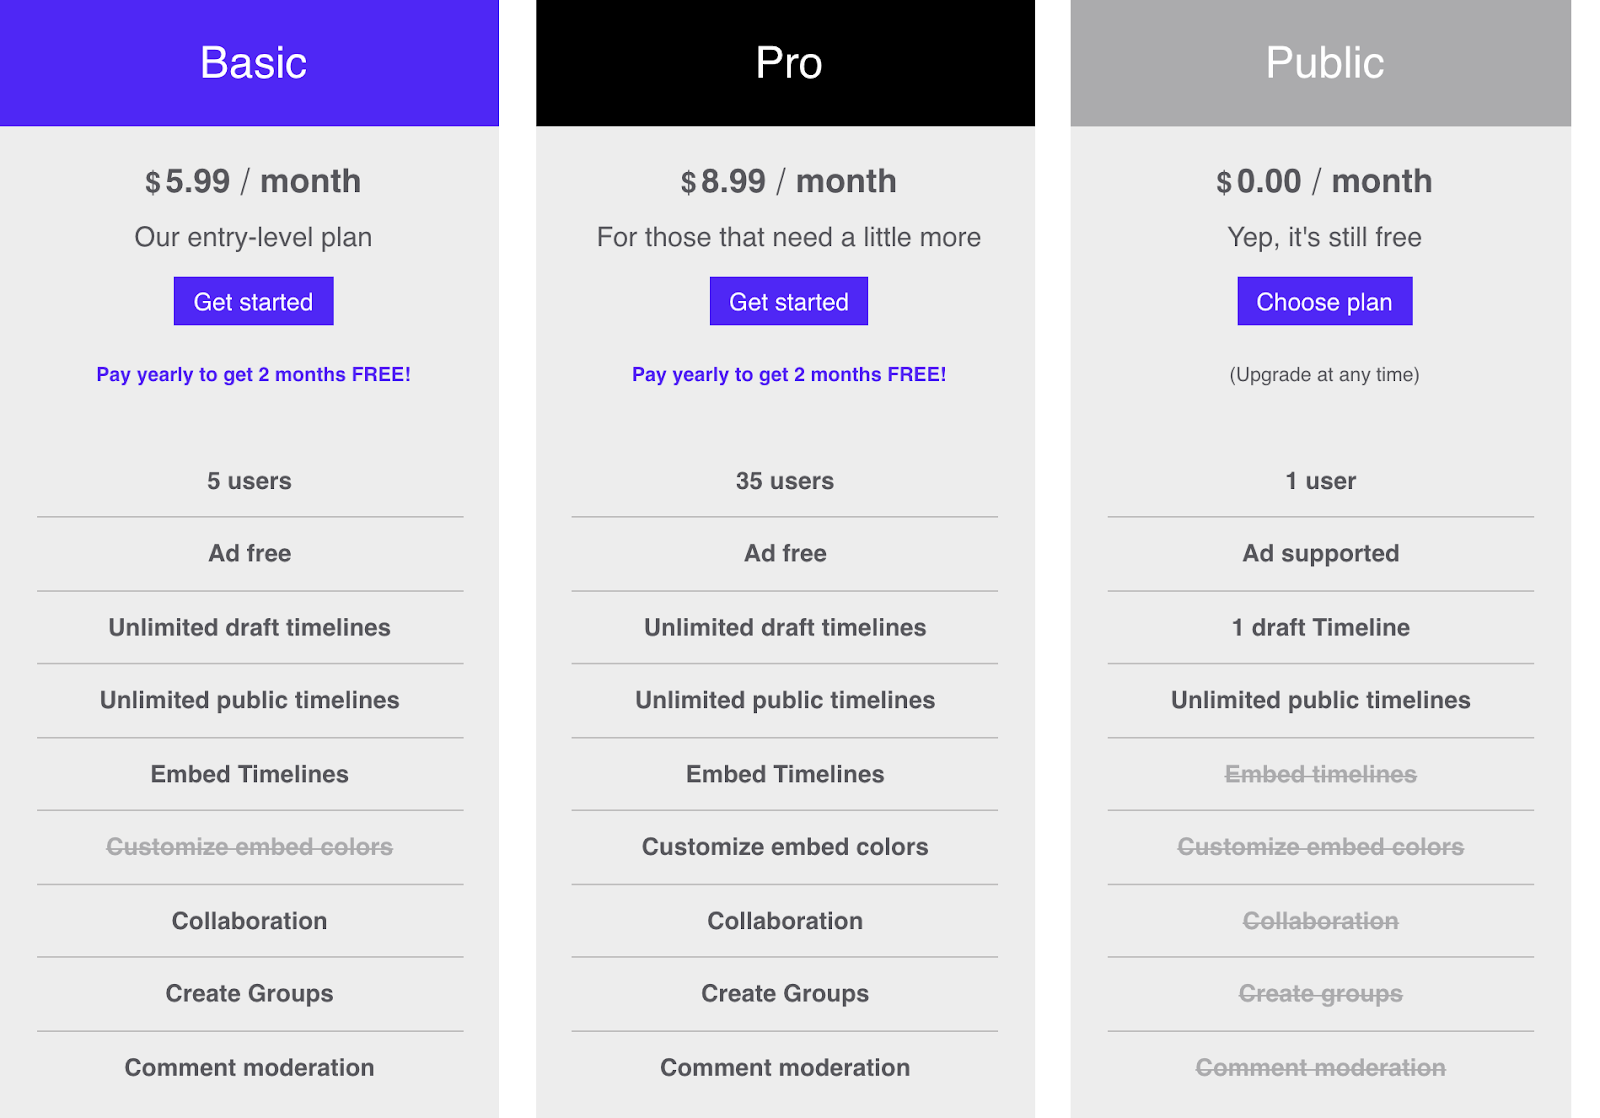
Timetoast can be used by teachers to share information and used by students to showcase their research. It has two types of timeline entries: either a single point in time called an “event” or a range of time called a “timespan.” For each entry, you can add more in-depth text that is accessed with a click. You can also embed pictures and links.
Timelines are great for historical events, but students could also use them to chart processes, like the life cycle of a butterfly. Teachers could use a timeline to layout a unit of study or to provide a list of important dates for students to remember throughout the year.
How to use Timetoast?
This video from Erin Paysen is a great place to start:
The free version will be adequate for most educators, but if you would like an online classroom to organize student work and the ability for students to collaborate on a timeline in real time, consider their subscription offerings here.
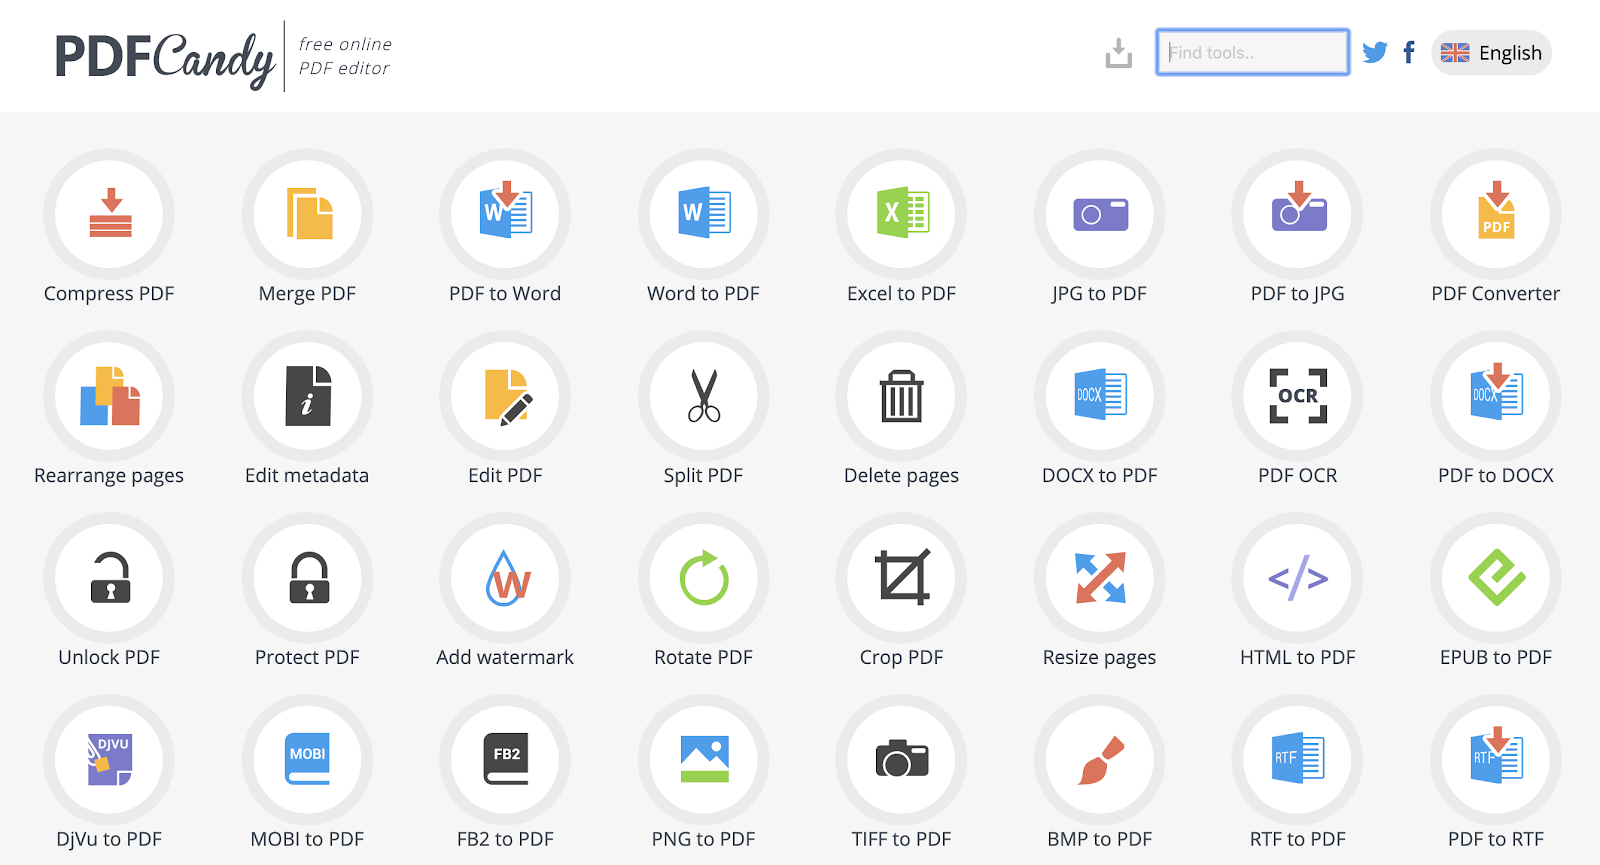
PDF Candy is an absolutely free online and offline tool for working with PDF files. You can use it to convert files to and from PDF, as well as do things such as merging multiple PDF’s into one, cropping a PDF, compressing the file size of a PDF, etc. All tools are provided at no cost and are ads-free.
You can upload files from your computer, Dropbox, or GoogleDrive simply by dragging and dropping them. After using a tool to manipulate a PDF file, you are provided with a list of other options that you can quickly jump to.
Powtoon allows you and your students to quickly make high-quality videos. They have ready-made templates with “drag and drop” customization. The process is as simple as making a PowerPoint. There is a wide range of styles to choose from, including animated, whiteboard, infographic, and live action.
How to use Powtoon?
This video from Jen Jonson is a great place to start:
The immersive reader is a full-screen reading experience to increase the readability of content. It was designed to support students with dyslexia and dysgraphia in the classroom, but it can help anyone who wants to increase their fluency or needs help decoding more complex texts.
How Does it Work?
When in Word Online, select View and then Immersive Reader. A new screen will launch. You can press the play button at the bottom to have the text read aloud to you. You can also select individual words to be pronounced in English or in the translation of your choice. You can change the text size, spacing, font, and background color to make the content more readable.
You also have the ability to color code and/or label words to indicate their part of speech. This can help readers decode more complex texts.
You can also narrow the focus of your reading experience by highlighting sets of one, three, or five lines.
You can activate the picture dictionary.
You can translate into other languages. There is even a whole page translation option.
Currently, the immersive reader is supported in Word Online, OneNote, Outlook, and PowerPoint. You can also use Office Lens to scan a printed text and place it in OneNote?—?then the program can use text recognition to launch the immersive reader. There is also an extension you can download to use the tool offline.
“Express ideas with ease by combining images, graphics, audio, video and text on one digital canvas.” – Glogster
What is a Glog?
Why Glogster?
Students and teachers can use Glogster to present information in an engaging, multi-dimensional way. It’s a digital poster where visuals, audio, and video can all be integrated into one display. A glog is also a free-form canvas where the user can select and zoom into content at their own self-guided pace.
Upgrading to the paid version gets you more media choices and a closed classroom environment where teachers can post assignments and monitor student work. Click here for more information on pricing.
How to use Glogster?
Here is a getting started tutorial from Jen Johnson:
Students can use Voki to create talking avatars that they can customize and easily share with a URL. Audio can be created through text-to-voice, their own voice recording, or an uploaded audio file. The free version does not even require a student account.
Upgrading to the paid version gets you more avatar choices and a closed classroom environment where teachers can post assignments and monitor student work. You can also upgrade to Voki Hangouts, which mirrors an online social network experience while giving teachers full control. Click here for more information on pricing.
Teachers can use Voki avatars to create engaging lessons that address multiple learning styles. For example, students can access instructional material with written text and a talking avatar reciting the information for more auditory learners.
Voki is a powerful presentation tool for students to creatively share their learning. The avatars are customizable, so students can practice the design process for a given task. For example, students could create an avatar for a character from Greek mythology, using their research to inform their design. Then they could write the script for the avatar to tell a story about one of their adventures.
Resources for Voki
Collection of tweets from teachers showing how they used Voki Blog featuring ideas for how to integrate Voki into your teaching Free Lessons that use Voki 5 Innovative Ways to Use Voki in the Classroom


